A new article from our community member Dr. Vincenzo Vitale.
Dental caries is one of the most prevalent diseases in humans, second only to the common cold (1). About 90% of adults aged ≥ 20 years had dental caries (2).
This data indicate that the majority of dental office procedures are related to restorative dentistry.
Decays treatment is mainly based on tooth’s destruction and the choices go for either direct or indirect restorations.
Willing to summarize an articulated concept in a simple one we could state that:
When there is no need to replace one or more cusps, a direct composite restoration is the preferred choice for its feasibility, economic and overall for its phisicochemical, aesthetic and longevity properties.
When dealing with a large Class I cavity, the challenge is to emulate natural and functional tooth morphology.
Several are the layering techniques proposed during the years to achieve this goal.
In this article will take a look, summarizing, at 4 of them in a step by step journey.
For a more detailed execution of each technique the reader is reminded to the bibliography.
Each tooth of the IV quadrant will be restored with one technique:
– Essential line(3). ON FIRST LOWER PREMOLAR
– Simultaneous Modeling technique (4). ON SECOND LOWER PREMOLAR
– Cusp by Cusp (5,6). ON FIRST LOWER MOLAR
– Occlusal compass (7). ON SECOND LOWER MOLAR

The number of dentin and enamel masses are based on personal preferences, depth of cavity and on the optic properties of the choosen composite.
INTRO:
– Essential lines: A simplified approach from StyleItaliano.org. This technique works in a subtractive way tracing the sulci and grooves to recreate the occlusal anatomy.
– Simultaneous Modeling technique: This technique works in an additive way recreating simultaneously and partially all the cusps and light curing them all at once. The cusps are then finalized all together with details and light cured again.
– Cusp by Cusp: Cusp by cusp, or clockwise. It is one of the oldest modeling technique.
Composite increments are applied from one ridge side to the next until the modeling is complete. Is essentially based on the concept of modeling completely one cusp at a time.
– Occlusal compass: (Is more a modeling technique for dental technician who work with wax and casts.)
It is based on the believe that the dynamic interrelationship of teeth is not limited to movement in just one plane. Teeth envelope a motion that has been separated into three planes of space: sagittal,frontal, and horizontal. Cusps and sulci guide the latter.
STEPS for dentin substrate:
“Dentin substrate color and shape does not belong to any of these modeling technique. The dentin/enamel color shades and layering method is personal. In this example they have been proposed for didactic purposes.“
– Essential lines: no dentine substrate. A single bulk layer of body shade composite is used.
– Simultaneous Modeling technique: no dentine substrate, a body shade composite is used.
– Cusp by Cusp A premodeled dentin substrate is performed with a biomimetic approach, meaning, the dentin layering goes towards the tip of the cusp creating a sort of pyramid (as in a natural tooth).
– Occlusal compass: Dentin is modeled recreating cusps draft that will be covered and finalized with enamel shade.

Modeling Steps:
STEP 1
– Essential lines: pack the composite following the cusps and marginal ridges removing the excess. It can be done with one layer of bulk composite or with multiple horizontal layers.
– Simultaneous Modeling technique: The modeling of the occlusal layer starts from a standardized cavity depth of about 1-2mm with no anatomic premodeling. Afterwards each cusp is predesignd simultaneously without closing the occlusal table (leaving space between the cusps)and lightcured.
– Cusp by Cusp:dentin is modeled with a biomimetic approach.
– Occlusal compass:Dentin is modeled as cusp substrate. Find the centric stop in the intercuspal position (ICP). Centric stops are built up until contact with opposing cusps.

STEP 2:
– Essential lines: trace sulci with a fine probe (or with a 0.8/0.10 k file) as illustrated in the Essential lines cards.
– Simultaneous Modeling technique: final cusps adjustments closing the occlusal table and adding details of secondary cusps.
– Cusp by Cusp: modelling completely one cusp per time following (not necessarily) a clockwise direction.
– Occlusal compass:Model completely one cusp per time starting from the stop of ICP. During the modeling is necessary to pay attention in recreating the motions of Mediotrusion and protrusive path to ICP. Laterotrusion, lateroprotrusion, and protrusion are critical in this final step
 STEP 3:
– Essential lines: Using a fine probe or a 0.8 k file add brown pigment in sulci in a point-like motion. Remove the excess with a brush or with a cotton pellet and Ligh cure it.
– Simultaneous Modeling technique: Using a fine probe or a 0.8 k file add brown pigment in sulci in a point-like motion. Remove the excess with a brush or with a cotton pellet and Ligh cure it. Add secondary morphology and details if needed
– Cusp by Cusp: Using a fine probe or a 0.8 k file add brown pigment in sulci in a point-like motion. Remove the excess with a brush or with a cotton pellet and Ligh cure it. Add secondary morphology and details if needed
– Occlusal compass: Using a fine probe or a 0.8 k file add brown pigment in sulci in a point-like motion. Remove the excess with a brush or with a cotton pellet and Ligh cure it. Add secondary morphology and details if needed
 STEP 4:
– Essential lines: Polish and lustre with carbide burs, silicon tips and polishing pastes
– Simultaneous Modeling technique: Polish and lustre with carbide burs, silicon tips and polishing pastes
– Cusp by Cusp: Polish and lustre with carbide burs, silicon tips and polishing pastes
– Occlusal compass: Polish and lustre with carbide burs, silicon tips and polishing pastes


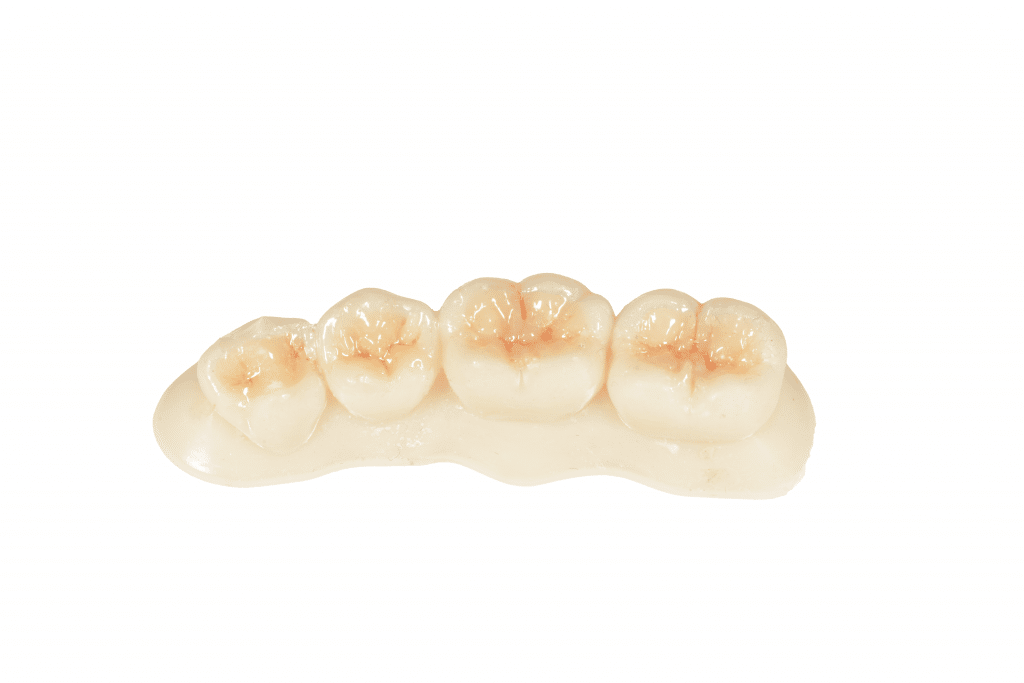

As seen, with all the four techniques is possible to achieve good results. To notice the difference in chroma and value created by the composite combination and stratification. The brown stains help in recreating a natural appearance increasing visual tooth depth.
The choice among composite shades and modeling technique is so personal and based on experience, time and practice.
The personal advice is to use a subtractive technique such as Essential Line for little cavities where a stratification can be hard.
An additive modeling technique such as a cusp by cusp or simultaneous modeling technique is advised for larger cavities. Being additive allows a full control over the composite apposition. In this way it will be possible to manage the height of the cusps and their shapes throughout the modeling.
The key is always having a look at the adjacent and/or controlateral teeth to see the natural morphology to recreate.
———————————————————————————————————————–
1 – Frencken JE, Sharma P, Stenhouse L, Green D, Laverty D, Dietrich T. Global epidemiology of dental caries and severe periodontitis – a comprehensive review. J Clin Periodontol. 2017 Mar;44 Suppl 18:S94-S105. doi: 10.1111/jcpe.12677. PMID: 28266116.
2- Heng C. Tooth Decay Is the Most Prevalent Disease. Fed Pract. 2016;33(10):31-33.
3- https://www.styleitaliano.org/essential-lines/
4- Scolavino, Salvatore & Paolone, Gaetano & Orsini, Giovanna & devoto, Walter & Putignano, Angelo. (2016). The Simultaneous Modeling Technique: closing gaps in posteriors. The international journal of esthetic dentistry. 11. 58-81.
5- Liebenberg WH. Posterior composite resin restorations: Operative innovations. Pract
Periodontics Aesthet Dent 1996;8:769–778.
6-Liebenberg WH. Successive cusp build-up: An improved placement technique for posterior
direct resin restorations. J Can Dent Assoc 1996;62:501–507.
7- The Occlusal Compass Concept: A Practical Approach to Posterior Tooth Morphology Russell T. De Vreugd, CDT* Published in QDT 1997
Share on: